Cloudy, yellowed headlights don’t just make your car look neglected, they cut night-time visibility by as much as 60 percent, turning a routine drive into a guessing game. Professional lens refinishing can cost well into triple digits, but a well-chosen DIY kit can restore that factory-clear output in under an hour for a fraction of the price. The challenge is separating the kits that deliver genuine, lasting results from the ones that leave you with swirl marks and fading within weeks.
I’m Amir — the founder and writer behind Four Wheel Ask. I’ve spent years analyzing automotive aftermarket products, studying manufacturer specifications, and aggregating real-world owner feedback to identify what truly works. This guide is built on that research, not on marketing claims.
Every kit here was evaluated for grit quality, sealant durability, ease of use, and real owner outcomes. After analyzing dozens of kits and real owner feedback, these are the best headlight restoration kits that consistently restore clarity for safer driving.
How To Choose The Best Headlight Restoration Kits
Not all restoration kits are created equal. Some rely on aggressive sanding that removes oxidation quickly but leaves micro-scratches that return haze faster. Others skip the sealant step, which means the clarity you just worked for disappears in a month. Understanding the key variables helps you pick a kit that matches your headlight condition and your available effort.
Grit progression and sanding method
The best kits offer a multi-stage grit system that steps from coarse to fine, typically starting around 500 or 600 grit and finishing at 3000 grit or higher. This progression removes deep oxidation without leaving visible sanding marks. Drill-powered kits speed up the process and deliver more uniform pressure, but they require a variable-speed drill set at 1500-2000 RPM. Hand-sanding kits demand more elbow grease but give you better control on oddly shaped lenses with tight curves.
UV sealant quality and longevity
The sealant is the most underrated component of any restoration kit. A quality UV-blocking clear coat locks in the polished finish and prevents re-oxidation for 12 months or longer. Kits that skip the sealant or include a weak wipe-on formula are the ones that leave owners frustrated when haze returns within weeks. Look for kits that clearly specify UV protection and list expected durability in months.
Kit completeness and extras
A truly complete kit includes sanding discs or paper in the correct grit range, a polishing compound, a UV sealant, and application tools such as a drill backing pad or foam block. Small extras like masking tape, spray bottles, and gloves can save a last-minute trip to the hardware store and make the difference between a smooth job and a messy one.
Quick Comparison
On smaller screens, swipe sideways to see the full table.
| Model | Category | Best For | Key Spec | Amazon |
|---|---|---|---|---|
| 3M 39008 | Drill-powered | Heavy oxidation removal | 500 / 800 / 3000 grit discs | Amazon |
| Meguiar’s G2990SRP | Hand-sanding | Long-term UV protection | 1000 / 3000 grit paper + sealant wipes | Amazon |
| SYLVANIA HRK.BX | No-tools manual | Ease of use with no drill | Surface activator + UV block clear coat | Amazon |
| Rain-X 610153 | Drill attachment | Quick drill-powered polish | Sanding/polishing drill attachments + sealant | Amazon |
| POLIWELL 24-Pack | Budget drill set | High value for multiple vehicles | 800 / 1000 / 3000 / 5000 grit discs | Amazon |
In-Depth Reviews
1. 3M Headlight Lens Restoration System 39008

3M’s 39008 system is the gold standard for drill-powered restoration, and the owner feedback bears that out. The kit includes 500-grit Gold Sanding Discs for cutting through heavy yellowing, 800-grit White Finishing Discs for smoothing, and a Trizact Refining Disc at the equivalent of 3000 grit for a polish-ready surface. The rubbing compound then finishes the job before any separate sealant application. Multiple owners report completing both headlights in 30 to 40 minutes, with results described as crystal clear and like new.
The drill attachment design delivers consistent pressure across the lens, which eliminates the uneven sanding that often plagues hand-only methods. Owner reports consistently note that the kit contains enough material to handle five or more headlight sets, making the per-job cost remarkably low. The main caveat from experienced users is that the included masking tape is too narrow for proper coverage, and duct tape is a better option for protecting surrounding paint. Several owners also warn that the flat 3-inch pad struggles with deeply curved lenses such as those on a Toyota Celica, where subsurface yellowing near edges may remain.
For the vast majority of vehicles with simple to moderately curved lenses, this kit delivers professional-grade results without professional-grade labor time. The 500-grit entry point is aggressive enough for neglected lenses but requires a steady hand and a drill set to roughly half speed to avoid digging into the plastic.
What works
- Fast drill-powered operation delivers like-new clarity in under 40 minutes
- Kit includes enough discs for multiple vehicle sets
- Trizact refining disc creates an excellent surface for polishing
What doesn’t
- Flat 3-inch pad struggles with heavily curved or contoured lenses
- Included masking tape is too narrow for proper paint protection
- No UV sealant included — requires separate purchase for long-term protection
2. Meguiar’s Ultimate Headlight Restoration Kit G2990SRP
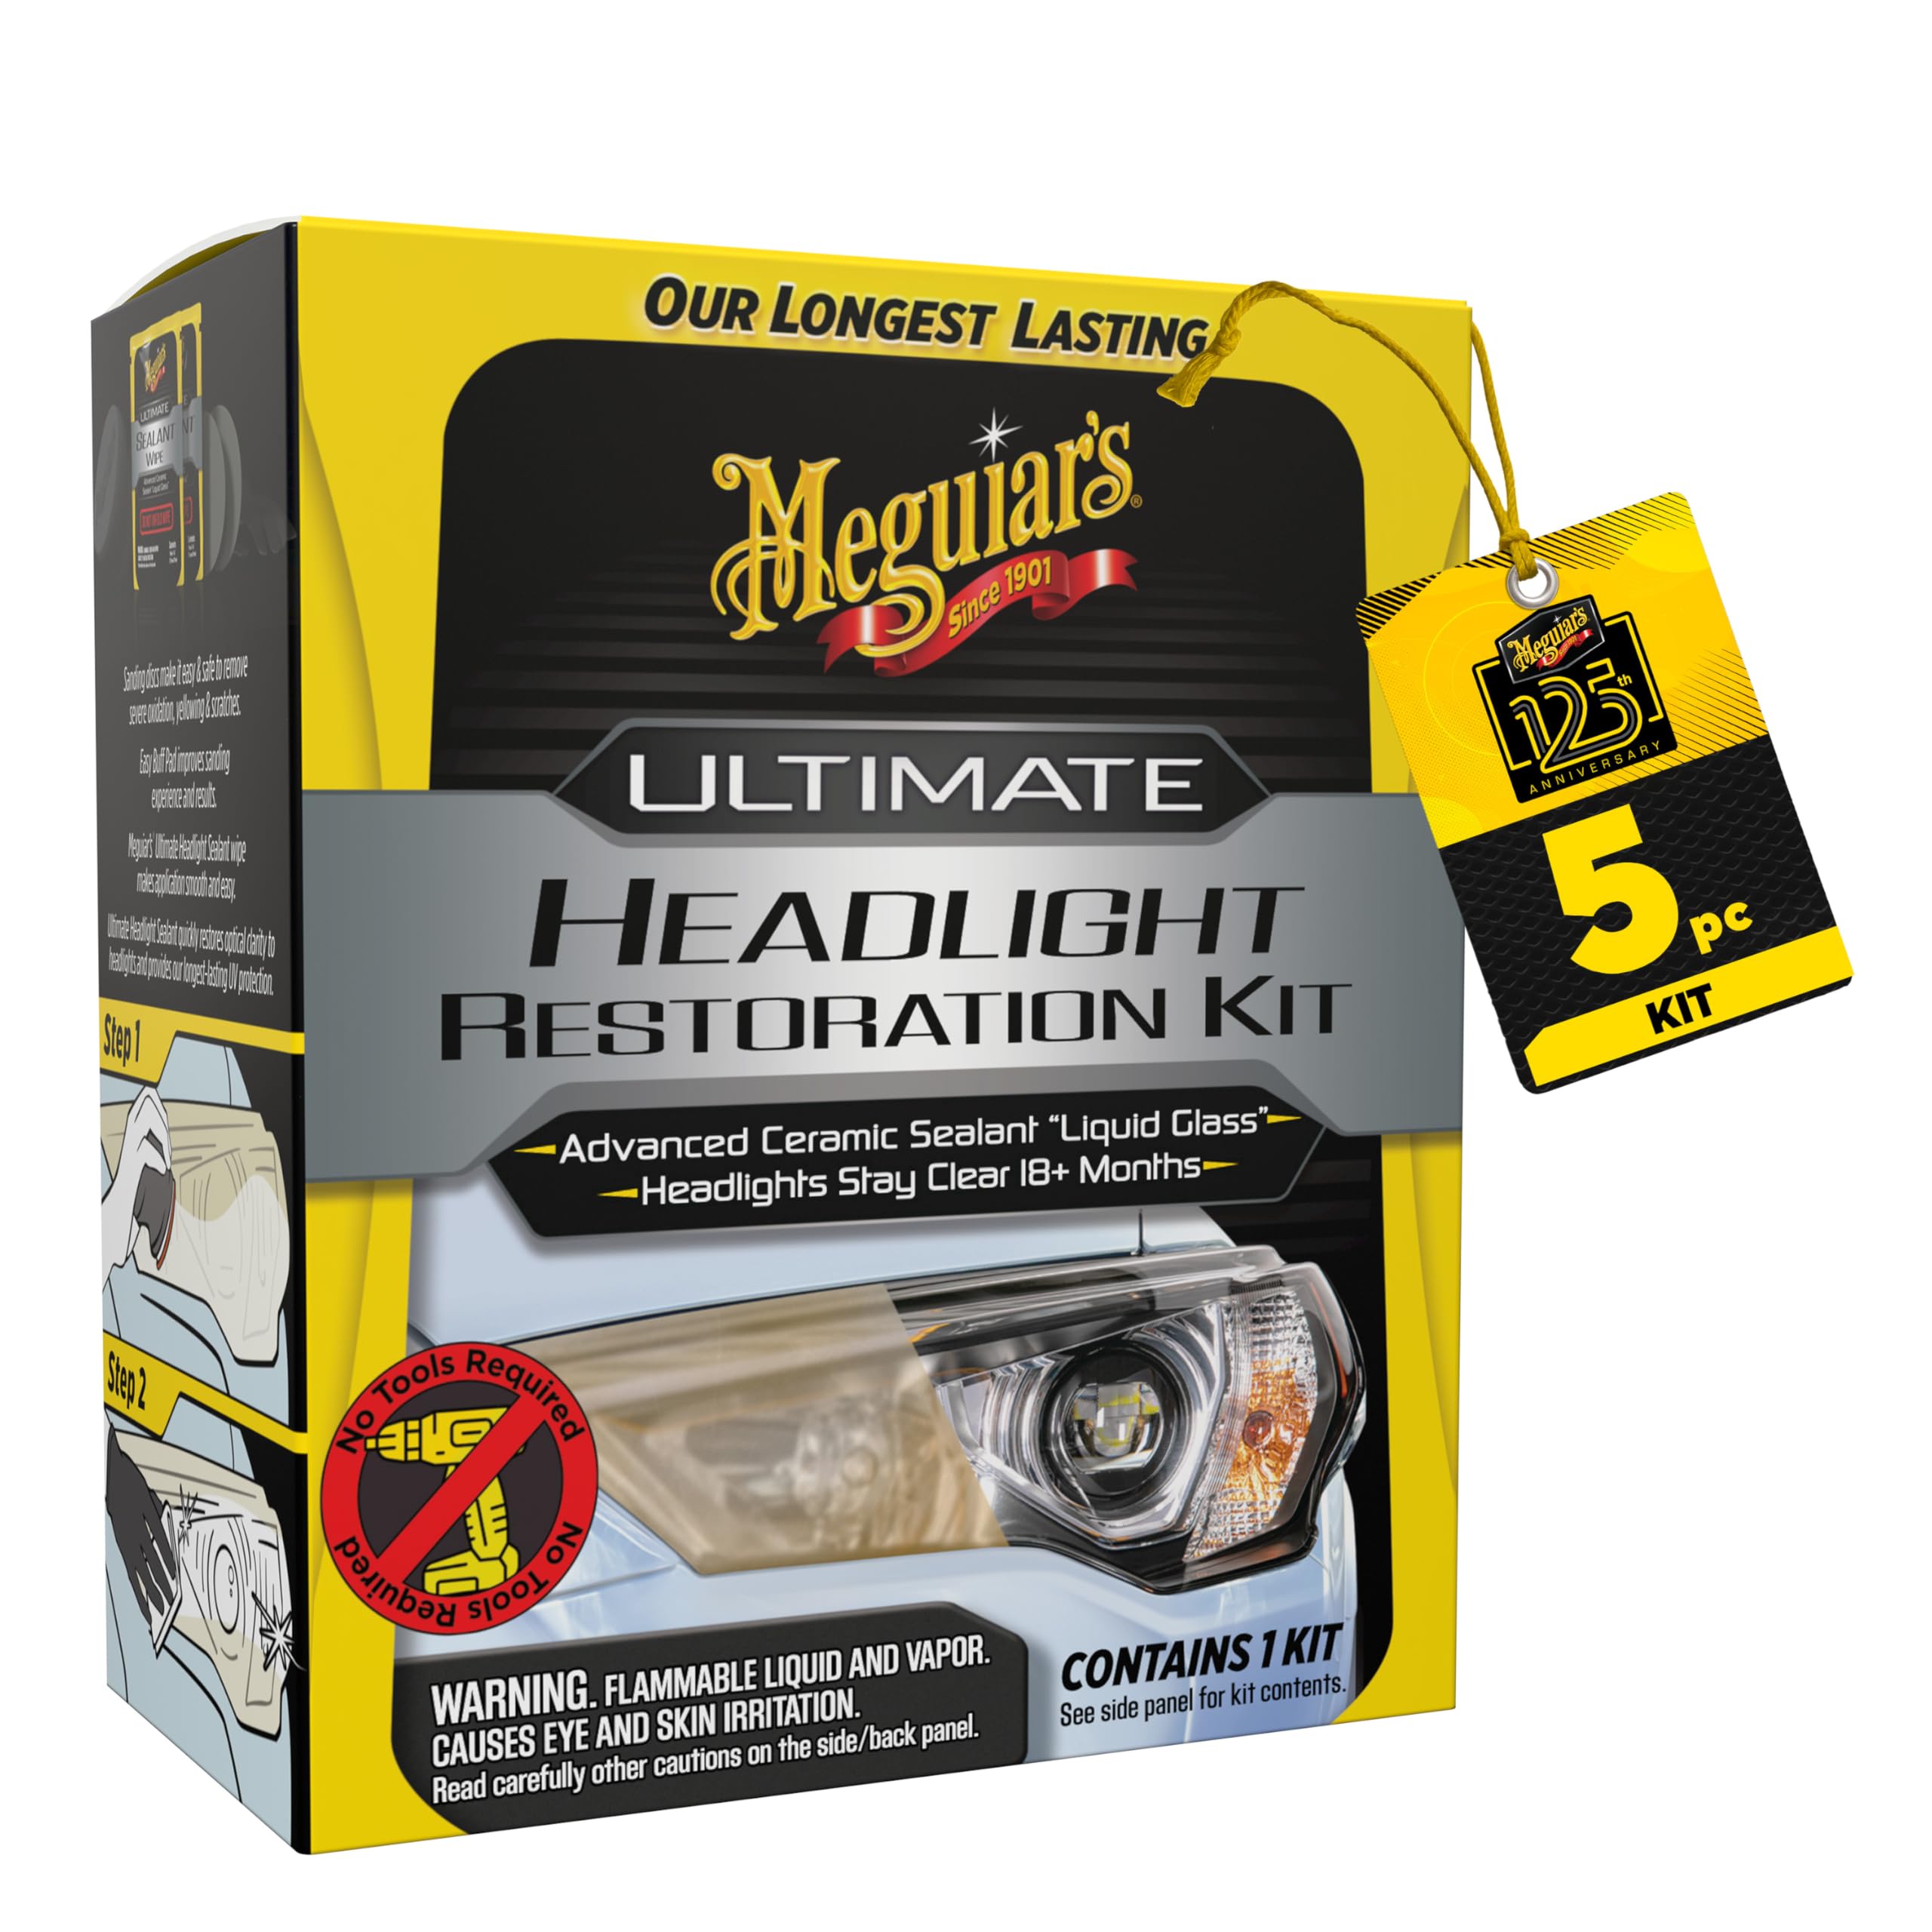
Meguiar’s has built a reputation for paint-care chemistry that translates directly to plastic lens restoration. This kit uses 1000-grit and 3000-grit sandpaper to remove mild to heavy oxidation, then finishes with pre-saturated sealant wipes that include UV protection rated at 18 months. The no-tools-required approach makes it accessible for anyone who doesn’t own a drill or prefers the tactile control of hand-sanding. Owner reports on 2015 RAV4 and 2008 Honda Pilot headlights describe results restoring lenses to roughly 99 percent of new condition.
The standout feature here is the sealant delivery system. The pre-saturated wipes apply a crystal-clear UV-blocking layer that dries without streaks when applied correctly. Multiple owners who had tried cheaper drill-attached or wipe-on systems reported that this kit succeeded where others failed, citing the sealant longevity as the primary differentiator. The kit also includes clear instructions that emphasize using ample water during sanding and avoiding touching the sealant surface after application. One owner noted that of the two sealant wipes included, one was completely dried out and unusable, which suggests quality control on the wipe packaging could be improved.
For owners whose headlights are moderately yellowed rather than severely pitted, this kit offers the best balance of ease, finish quality, and post-restoration protection. The hand-sanding requires more physical effort than a drill system, but the risk of burning through the lens or slinging compound onto surrounding paint is virtually eliminated.
What works
- UV sealant wipes deliver up to 18 months of clarity when applied correctly
- No drill or power tools needed — accessible to any DIY owner
- Consistently outperforms cheaper wipe-on and drill-attached systems in owner testing
What doesn’t
- Sealant wipe packaging has occasional quality control issues with dried-out units
- Hand-sanding requires more time and physical effort than drill-powered kits
- Less effective on deeply pitted or severely neglected lenses needing aggressive grit
3. SYLVANIA Headlight Restoration Kit HRK.BX
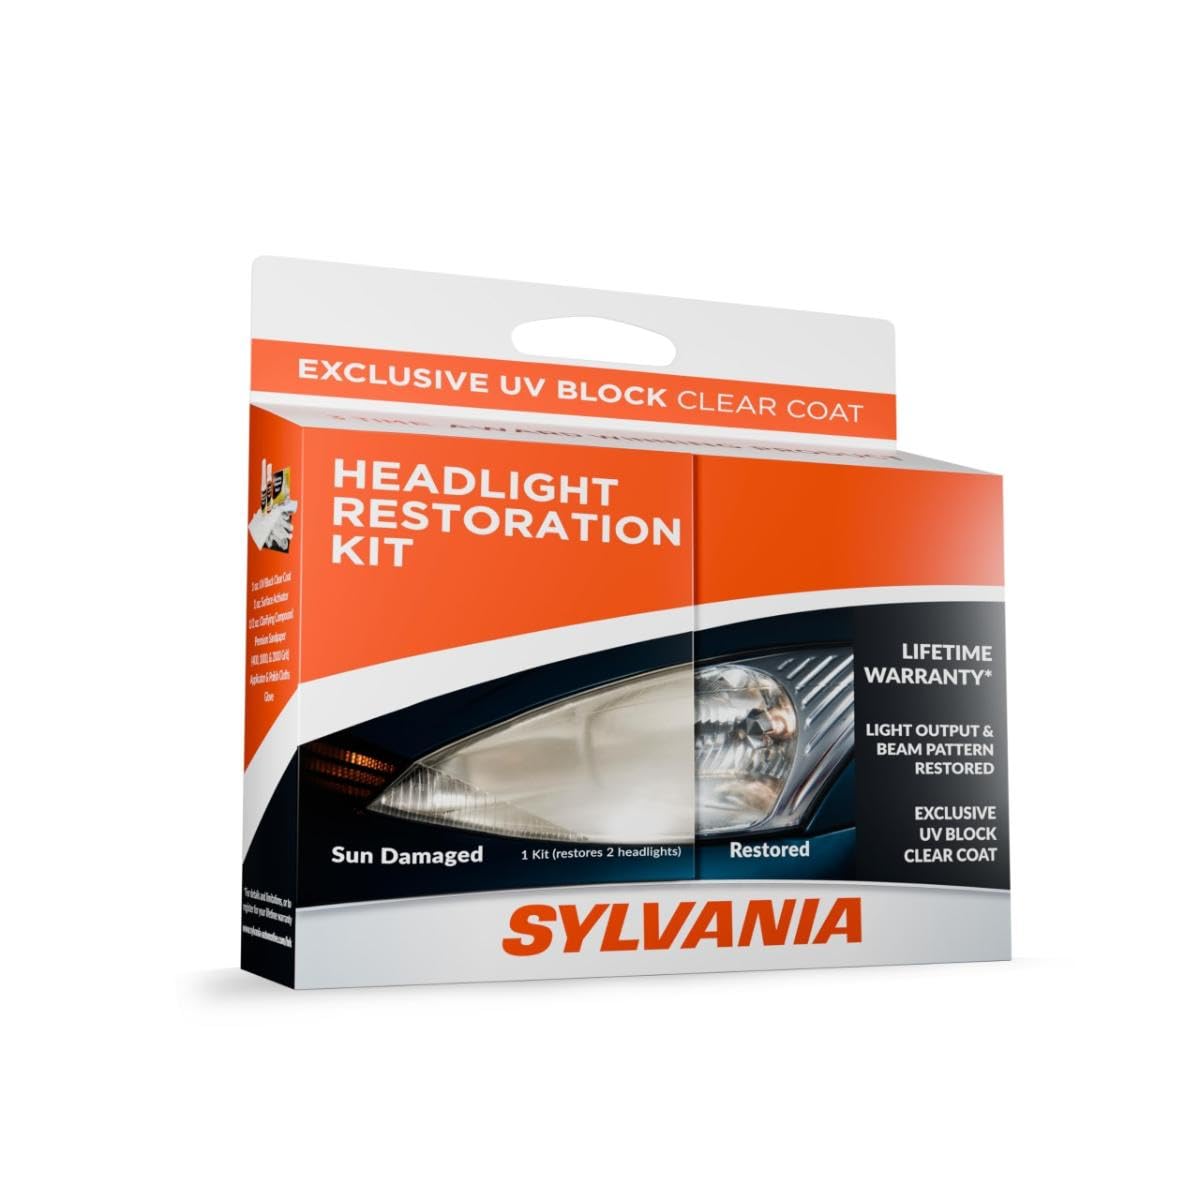
SYLVANIA’s restoration kit has been a staple in the category since 2010, and its longevity on the market speaks to consistent results. The system uses a surface activator, premium sandpaper, a clarifying compound, and an exclusive UV-block clear coat — all without requiring a drill or any power tool. Owners who restored 17-year-old Yaris headlights and 2011 Toyota sedan lenses describe results that remain crystal clear for three months and beyond, saving hundreds compared to dealer replacement costs.
The no-tools design makes this kit particularly appealing for owners who want a straightforward Saturday morning project without buying or borrowing a drill. One owner emphasized using roughly 1.5 gallons of water during sanding and applying the activator generously, which aligns with the instructions. The UV clear coat application requires overlapping strokes, and several owners noted that a single coat was insufficient — the kit includes enough material for two full applications if the spray is used conservatively. One detailed review pointed out that the process is time-consuming at roughly two hours and that the warranty registration requires submitting a phone number, which raised a privacy concern for that owner.
For the owner who wants a complete system with a dedicated UV clear coat and doesn’t mind working by hand, this kit delivers reliable results at a fair price. The key to success is reading the full instructions before starting, using ample water, and applying the clear coat in two thin, even layers without overlapping wet edges.
What works
- Complete system with UV block clear coat for long-lasting protection
- No power tools required — accessible to all skill levels
- Proven track record with over a decade of positive owner feedback
What doesn’t
- Two-hour process is slower than drill-powered alternatives
- Overlapping strokes during clear coat application can create visible haze
- Requires ample water supply and extra spray bottles for best results
4. Rain-X 610153 Headlight Restoration Kit

Rain-X brings its windshield rain-repelling chemistry expertise to headlight restoration, and the result is a kit that emphasizes speed and simplicity. The system includes sanding and polishing drill attachments, a sealant wipe, and step-by-step instructions that owners describe as easy to follow. Multiple owners with heavily yellowed lenses reported completely clear results in about 20 minutes per vehicle, with one Lexus owner noting that following the 1500-2000 RPM drill speed recommendation was critical to success.
The drill attachment design eliminates hand fatigue and delivers consistent coverage across the lens surface. Owners emphasize trusting the process and not skipping the wet sanding step. However, a critical warning appears consistently in feedback: the polishing compound slings off the drill attachment and speckles surrounding paintwork, and it does not come off easily. Owners of non-white vehicles reported discovering blue, black, or red speckling on their fenders and bumpers after the compound dried. Proper masking with painter’s tape and plastic sheeting is not optional with this kit; it is mandatory.
One owner of a 2013 RAV4 noted that while the drill attachment helped, hand wet-sanding with 2000-grit paper was still needed for full clarity, and the kit’s polish was supplemented with a dedicated plastic polish for the final finish. The sealant wipe, when applied gently and left untouched after application, provided good initial protection. This kit is best suited for owners who already own a variable-speed drill and are willing to invest extra time in masking to protect their paint.
What works
- Drill-powered attachments deliver fast results in as little as 20 minutes
- Simple process with clear, easy-to-follow instructions
- Protective sealant wipe extends clarity when applied correctly
What doesn’t
- Polishing compound slings off easily and is extremely difficult to remove from paint
- Heavy oxidation may still need supplementary hand wet-sanding
- Masking with extensive tape and sheeting is mandatory, not optional
5. POLIWELL Headlight Restoration Kit 24-Pack

POLIWELL’s 24-piece kit offers the most comprehensive grit progression in this lineup, with 800-grit scrubber pads plus 1000, 3000, and 5000-grit sanding discs for a five-stage restoration process. The kit also includes a drill attachment, foam interface pad, polishing compound, UV coating, masking tape, and a spray bottle. Owner reports on a 2005 Pontiac GXP describe restored headlights in about 20 minutes per lens with only minor swirl marks that were polishable, and no re-hazing after two months of sun exposure.
The sheer volume of consumables included — multiple discs at each grit level — makes this kit ideal for owners who plan to restore multiple vehicles or who want spares in case of mistakes. One owner successfully used it to restore a vintage 1979 turntable dust cover, which speaks to the versatility of the sanding discs on acrylic surfaces. The instructions are printed directly on the packaging, which eliminates the risk of losing a separate instruction sheet. However, feedback is mixed: while many owners report excellent results, a minority found the kit ineffective even when following the directions exactly. The 800-grit scrubber pads are very coarse and can leave deep scratches if not used with careful technique and ample water.
For the budget-conscious owner who already owns a drill and is willing to practice technique on a less-visible area first, this kit offers tremendous value per dollar. The UV coating included in the package provides protection, though its longevity compared to premium sealants is not well-documented in owner feedback. The key to success with this kit is using a light touch, keeping the surface wet throughout sanding, and progressing through every grit stage without skipping.
What works
- Five-stage grit progression from 800 to 5000 for thorough refinement
- Generous 24-piece set includes masking tape, spray bottle, and UV coating
- Enough consumables for multiple vehicles or multiple attempts
What doesn’t
- 800-grit pads are very aggressive and can cause deep scratches with poor technique
- Inconsistent results reported by a subset of owners who followed directions
- UV coating longevity is unverified compared to premium-brand sealants
Hardware & Specs Guide
Sanding Grit and Progression
The grit number indicates how many abrasive particles per square inch — lower numbers mean coarser abrasives that remove more plastic. A proper progression typically starts at 500-800 grit for heavy oxidation, moves to 1000-1500 grit for smoothing, and finishes at 3000-5000 grit for a polish-ready surface. Skipping a grit level or jumping too fast leaves micro-scratches that trap dirt and accelerate re-hazing. Wet sanding with a spray bottle reduces friction, prevents clogging, and produces a more uniform surface.
UV Sealant and Clear Coat
Polycarbonate headlights are inherently porous and UV-sensitive. A restoration is incomplete without a UV-blocking sealant that fills micro-pores and creates a barrier against sunlight. Quality sealants offer 12 to 18 months of protection and dry crystal clear. Cheaper kits often omit this step or include a weak formula that fails within weeks. Sealant wipes are convenient but prone to drying out in storage, while liquid clear coats applied with a foam pad typically last longer and are more consistent.
Drill Attachment vs. Hand Sanding
Drill-powered kits use a backing pad that spins sanding discs at speeds of 1500-2000 RPM. This delivers even pressure, faster material removal, and less hand fatigue. The trade-off is reduced control on contoured lenses and the risk of slinging compound onto paint if the drill is angled incorrectly. Hand sanding takes longer but offers precise control on tight curves and eliminates the speckling risk entirely. For severely neglected lenses on simple-shaped lamps, a drill attachment is faster. For complex curves or first-time users, hand sanding is safer.
Kit Completeness and Preparation
A fully equipped kit includes multiple grit stages, polishing compound, UV sealant, masking tape, a spray bottle, and gloves. Missing any of these components forces a trip to the hardware store mid-project. Masking tape width matters — narrow 1-inch tape is insufficient for protecting fenders and bumpers from compound splatter. Proper surface preparation also includes washing the headlights with soap and water to remove road grime before sanding. Skipping this step embeds dirt into the abrasives and creates unnecessary scratches.
FAQ
How often do headlights need to be restored?
Can I restore headlights without a drill?
Why do my headlights look hazy right after restoration?
Will a restoration kit work on foggy or yellowed taillights?
How do I prevent restoration compound from damaging my car’s paint?
Final Thoughts: The Verdict
For most buyers, the best headlight restoration kits winner is the 3M 39008 because it combines drill-powered speed with a proven grit progression that handles heavy oxidation in under an hour. If you want 18 months of UV protection without using a drill, grab the Meguiar’s G2990SRP. And for a budget-friendly option with enough consumables for multiple vehicles, nothing beats the POLIWELL 24-Pack.

Certification: BSc in Mechanical Engineering
Education: Mechanical engineer
Lives In: 539 W Commerce St, Dallas, TX 75208, USA
Md Amir is an auto mechanic student and writer with over half a decade of experience in the automotive field. He has worked with top automotive brands such as Lexus, Quantum, and also owns two automotive blogs autocarneed.com and taxiwiz.com.